Showing posts with label halloween. Show all posts

Monday, November 4, 2013

Mario Batali Costume

Saw this idea on "the Chew" about a week before Halloween and knew I had to do it. Why fight the red hair- I say work with it, plus I already had the orange Crocs, actually I didn't buy anything for this costume. It got a good laugh out of everyone and was cheap and easy- win win win!
How cute is that ponytail?


Pin It

Friday, October 11, 2013

Costume Time

It's that time again, so let's review the Halloween projects we've done in the past. First Wise-Old-Owl-Glasses- the perfect costume for someone whooo doesn't want to dress up (see what I did there?)

http://emmyinthemaking.blogspot.com/2012/11/wise-old-owl-glasses-diy.html

Next the perfect costume for any momma who thinks fake body hair on an infant is hilarious: Circus-Strong-Man

http://emmyinthemaking.blogspot.com/2012/11/strong-little-man.html

And finally a really cute and easy DIY-Raggedy-Ann
http://emmyinthemaking.blogspot.com/2011/11/i-had-fun-time-putting-together-this.html

So what's in the line-up for this year? So far I really like Clark Kent, Rooster Cogburn, or Ell-i-ot and ET as costumes for Huck. If you have any stellar ideas please share!

Emmy

Pin It

Friday, January 11, 2013

strong man softie

I've been working on some sewing projects for Huck's b-day presents next month
I made this plush strong man to go with his circus themed birthday and to turn his Halloween costume into a keepsake. 


It looks like the sock monkey is putting the moves on the strong man.


I'm not a good independent seamstress. I get overwhelmed and angry because nothing ever turns out right the first time, so this would not have been possible with out the help of my mom and my friend.

To make:
We cut the whole shape out of the striped fabric and layered everything else on as appliques.

The skin is a peach flannel and the hair, mustache, and eyes are black felt.

 We just drew up a sketch on paper to use as a pattern.

You could then use iron on webbing to attach the appliques or you can be brave like I was and just try to hold them in place while you stitch around the edges.

 Use a fabric pen to add some lovely chest hair.

Once all your appliques are on put the right sides together and stitch all the way around the edge of your strong man, leave a small part open to turn.

Turn, stuff, and finish your edge. BAM! You're done!

Now onto some randomness...
It is supposed to be 63 degrees today! in January? Yep! So excited, it is just the babe and I today which means when he wakes up from his nap we are going to paint this town red. What does that mean you might ask? We are probably going to hit up Joann's, some flea markets and the park! Oh yeah, we're wild like that! Taking care of small babies means I basically never go outside- I miss you, outside!

I hope everyone else enjoys their day as much as I am!
Emmy


Pin It

Thursday, November 1, 2012

Strong Little Man


What two posts in one day? I know, I know... Just too much craftiness going on!

I am loving the vintage circus stuff these days, hence dressing my son as a circus strong man for his first halloween. I grew up with all homemade halloween costumes, my mom was never one for commercial costumes and I think it is a lovely tradition and a way to stay unique.


For this costume you need some striped stretch knit fabric, dumbells (tute to follow), a mustache, and some chest hair- I used eyeliner.

For his leotard I used an old shirt I had that I didn't wear anymore. I cut it into a one shouldered leotard leaving one of the remaining side seams. Stitched up the other side to fit around him and stitched accross the top of the shoulder strap. Finally I cut a slit where the crotch would be to make legs and stitched that up. To be honest all I did was cut out the fabric, my mom did all the sewing. I could have done it though, ok?

It would have been great to do this tutorial before halloween so people could use it, but keep it in mind for next year, or use it for a birthday party. Huck's 1st birthday is in February and I have already decided on a circus theme, so he may get to wear this again!
 
The costume was a hit! Man I love that kid!
 
 
Emmy
 
Pin It

Wise Old Owl Glasses DIY


I saw this Martha Stewart craft on pinterest the other day and knew I had to make a couple pairs of these for hubby and I to wear while we take Huck trick or treating. He isn't super into dressing up for halloween, and by that I mean he usually refuses, so the fact that he was totally down for this makes this costume a winner in my book.

Supplies needed:
old glasses frames, the bigger the better
hot glue
feathers
orange cardstock

Cut a triangle out of your cardstock- be sure to make it big enough to cover your nose. Use the hot glue to attach it to the nosepiece of your glasses. Be sure to angle it out to allow your nose to fit inside. Finally attach the feathers to the top of the glasses with your hot glue. Make some stick out on the sides and some sticking up like an owl's horns.

Too easy, too cute!

Linking up at House of Hepworths, Crafty Soiree, Somewhat Simple, Whatcha Work-up and Live Laugh Rowe

EmmyPin It

Monday, October 29, 2012

pumpkin carving with our little pumpkin


Today we took Huck to his first pumpkin patch and carved our first jack-o-lanterns together. Jim had the idea to let Huck draw his own design on his pumpkin. After Jim carved it out and added his name it looks pretty neat! What a good daddy!
 
pumpkins carved- check
Halloween costume done- check (my mom finished it for me, hee hee!)
 
We're ready for halloween! How about you?
 
linking up for mommy moments!
 
Emmy

Pin It

Wednesday, October 3, 2012

No-Sew Fabric Pumpkins

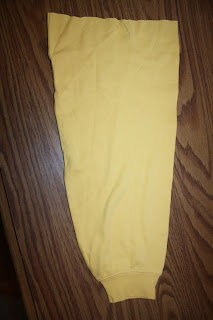
Here's a craft for you just in time for your fall decor. Remember me telling you to save the sleeves off of the shirt you used to make the T-shirt scarf? Ok, get that back out now to make a fabric pumpkin. This craft was taught to me by my sister in law last weekend.
 Cut off a sleeve- the longer it is the taller your pumpkin will be. Turn sleeve inside out
Tie rubber bands tightly at each end of the sleeve.
 Cut a slit in the tube for stuffing- it will be less noticeable if you cur it in the sleeve's seam.
 Turn right side out and stuff.
 Use hot glue to shut seam- you could stitch it if you want.
 Finally use a needle and thread- we used embroidery floss- to sew up from the bottom through the middle and around to the top- continue as many times as you want to create the pumpkin segments- you probably want at least 5 segments to your pumpkin.
This is the finished product. The smaller pumpkins are much easier to get the thread through. But if you want a big pumpkin don't let that stop you! It can be done!

Linking with sew much ado, the trendy treehouse, my girlish whims, polkadots on parade, and sugar and dots.

Fun Fun,
Emmy

Pin It